Showing posts with label quilts. Show all posts

Wednesday, 30 March 2011

Some Success

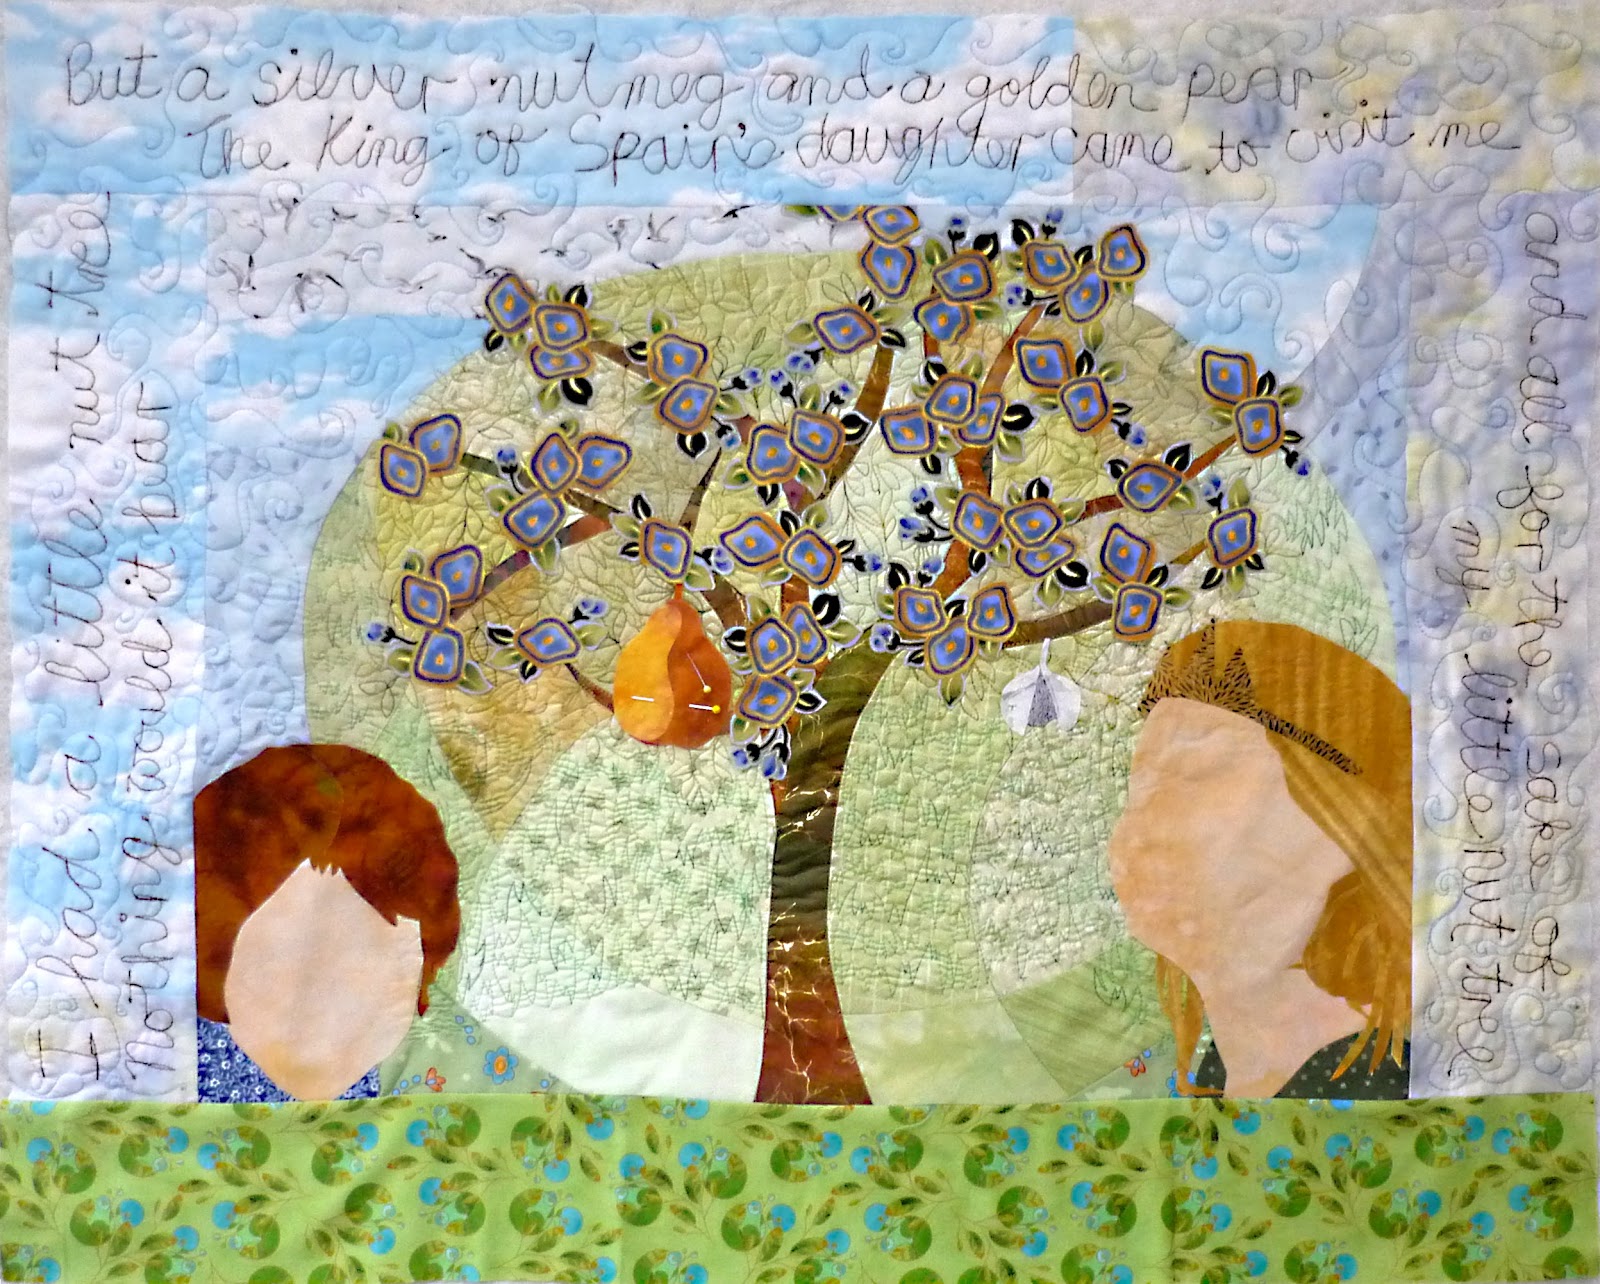
Remember this quilt?  It was done for a challenge for our club quilt show. The Quilt Show was a couple of weekends ago and this quilt won first prize in the challenge to my genuine surprise. I thought the faces were a failure as, close-up, the close quilting makes the little girls look like old ladies with wrinkles.


Now this quilt, which also won first prize in its section, I did think had a chance. It was done for a different challenge in the same quilt show. We were to choose a magazine ad, in any magazine except a quilting magazine and make a quilt inspired by the advertisement. I chose this ad:
And here is a closeup of the very close quilting and the edging which I made by cutting bias strips with a wavy edged blade on my rotary cutter and then I zigzagged it onto the edge of the quilt.
To develop the idea for the quilt, I scanned the picture of the ad and took it into my art programme on the computer. I then played around with various filters and chose one to use as inspiration. There were a few that looked possible:


 The middle option looked like snippets which is a simple technique so that's what I chose to do but I'd like to have a go at the first option sometime! Maybe with fuzzy wools appliqued to a surface....

Friday, 5 November 2010

Gluten Free Rosemary Scones

I made these the other day and took a couple to quilt club today. Ruth asked for the recipe. They are very yummy. I found the recipe on one of the gluten free blogs i follow and adapted it a little for New Zealand tastes.It is dairy free (because it uses soy milk but I imagine it doesn't need to) and egg free as well as gluten free but it is very easy to make and amazingly moist. It freezes well too. The applesauce replaces the egg.

1 c. almond flour (I used one cup of unpeeled almonds, ground in a little food processor so it wasn't really flour texture, more a mealy texture)
1/2 c. brown rice flour
1/2 c. tapioca starch
1 tsp guar gum
2 tsp baking powder
1 tsp baking soda
1/2 tsp salt
generous tbsp of chopped rosemary
2/3 c. soy milk + 1 tbsp lemon juice
1/4 c. unsweetened applesauce (I used stewed apple processed in the little food processor with a tbsp of soy milk)
1/4 c. rice bran oil (or whatever you usually use for baking)

Preheat the oven to 410-420 degrees fan bake.
Mix all of the dry ingredients together well. Mix lemon juice with milk and allow to stand a little. Mix applesauce with oil and cut into the dry mixture. Add the milk with the lemon juice and stir well. This is a fairly wet mixture, like a muffin mix. It may be put into greased muffin tins or scooped out onto a greased or lined tray. Bake for 12 min until nicely browned. Makes 10.

Now, because every post must have a picture and i don't have pictures of the scones, here is the little quilt I finished at quilt club today. It is about 8"x8" and I don't know what I'm going to do with it...

Wednesday, 6 October 2010

Only just large enough

I measured the quilt when I had made the final trim, ready to bind - it was exactly 24" tall (if you use one of my rulers, its about 1/8" short with the other but we won't tell the judge). The rules of the challenge state that each edge must be between 24" and 36" and that it must use a recognisable amount of the challenge fabric. The tree leaves/flowers are cut from the challenge fabric.

The sky was partly quilted and then unpicked, completely quilted and unpicked again. So this is the third quilting for some of the sky. The grass under the tree was quilted and then quilted again over the top - so that is quilted twice. The faces have been quilted and unpicked too many times to count and I'm still not happy with them but I don't really know what to do about it now. Closer quilting helped as did using a smaller needle - it took me three lots of unpicking on the faces to realise that the stitches looked wrong because they were dark and that was because even though I was using a pale thread I was using a large needle which was leaving dark holes.

Apart from the quilting (which I am finally very happy with except for the faces), the biggest success was the small dark blue interior border. I made that by folding a piece of 1cm wide blue ribbon in half and sewing it down with a double thread and wide zig zag stitches. It made a big difference to the overall design. I'm also pretty happy with the silver nutmeg and the golden pear.

Tuesday, 14 September 2010

I hesitate to post this

because the faces aren't finished yet... I've unpicked and resewn the shading on Aimee's face three times and its still not right. Jess's seems to be going more easily but I'm not so far down the track on her face yet.


Sunday, 12 September 2010

Stones Finished


So, I've finished the small A3 size quilt I started in Chris Kenna's workshop on Saturday. I'm rapt with the quilting and now that I've learnt how to do these contour lines with a neat back to the quilt I will be using a similar technique to finally quilt my large Delphinium I quilt. Hopefully in time to submit for Symposium next April.

Chris taught us to start with five small (0.5 stitch length) stitches before starting the row and finish again with another 5 small stitches. This produces a much neater back than using the automatic stitch finishing on either of my machines. Chris also suggested using an envelope turn to finish the edges rather than a binding - bindings can be proportionally too large on such a small quilt. To do this you take two pieces of fabric each the same width as the quilt and each about 2" or 3" longer than half the length of the quilt. Put the quilt face up on the table. Place the pieces of fabric face down on the top of the quilt matching the sides and top and bottom of the quilt so that the extra lengths overlap in the middle. Fold back 1" on both overlaps so that the edges will be finished when turned.  Pin in place. Sew a 1/4" seam around the outside edge of the quilt. Turn to the back. Press, making sure the backing does not show from the front. Slipstitch the opening closed. Finish with a row of stitching 1/4" from the edge.

Another thing I learnt from Chris was the motif used on quilting the sky. I should have done it smaller and it definitely needs practice to make it smoother but I'm glad to know how to do it.

Saturday, 11 September 2010

Workshop with Chris Kenna

I'm off today to the second day of a workshop with Chris Kenna. We are making landscapes from our own photos. I really enjoyed her discussion on *looking* at a photo properly, finding out the light source, working out what the colours really are.

This is yesterday's work - Terry's photo on the right, my pieced version on the left. Today we layer and quilt it before adding an appliqued focus piece. My focus piece will be the stones with their dark shadows. Others will add branches or trees to their landscapes.

Wednesday, 8 September 2010

I had a little nut tree

I'm making progress. Here is a link to the original posting on this quilt

Saturday, 28 August 2010

Quilt Show Challenges

Our club, Cotton-On Quilters is having their bi-ennial quilt show in March 2011. We have three challenges - two of them are open challenges so if you are interested please contact me and I will sent you the information. One of the open challenges is Make Us Smile - size to be A3 size (12"x16").

Here is my entry for that challenge. I know its not stunning. But I made the background as a demonstration of weaving at our club one Saturday. It was a large weave so that it was quick to demonstrate. Then I wondered what I was going to do with it. This is the result - and its an entry!

Did it make you smile?

The second challenge I am working on is only for club members. We are to use this fabric:

and make a quilt that is no larger than 36" on any side and no smaller than 24" - Any subject. My quilt is going to illustrate the children's song: "I had a little nut tree, nothing would it bear, but a silver nutmeg and a golden pear. The king of Spain's daughter came to visit me and all for the sake of my little nut tree".

Here is my working drawing with a piece of tracing paper on top. The tracing paper has the lines for my background pieces and the tree. The working drawing was put together in an art programme on the computer then printed out full size:

And here is the background and tree pieced. The flowers have been cut from the challenge fabric and placed on the tree but not sewn down yet. I will quilt the background before I sew the flowers, golden pear, silver nutmeg and girl's faces on the top. I am going to use photos of my grand-daughters for the faces, not the clip art ones shown in the working drawing.

I will put a border around this part before I put the faces on and I'll stitch the words of the song on the border.

Tuesday, 3 August 2010

A Finished Boat

All finished apart from the label which I will do on the computer this morning. The quilting would have been a bit smoother if I had taken the Juki off the Swiftquilter but I didn't, I used the Pfaff instead. Also, if I had tidied my sewing table and spread some silicon around it might have slid a bit better too...

Oh, well.


Thursday, 29 July 2010

Further Development

I had another happy few hours in the sewing room today, working on the boat I started in the unstructured piecing workshop. Here is progress. I have pieced boat sails down the left side and across the bottom using the method we were taught for the stars.

The top and bottom borders are not yet completely pieced or sewn to the rest of the quilt top. In fact the medium triangle in the top right hand corner is just folded and pinned to the dark one. I am in two minds about that, whether it should be a light one with the dark as in the bottom left hand corner. I welcome your comments :-)

Sunday, 25 July 2010

A Weekend Workshop

I've spent the weekend at a quilting workshop run by our club, Cotton-on Quilters. Griet Lombard taught 16 of us how to piece blocks without a pattern or a ruler! Check out the club blog in a day or two. I'm sure there will be pictures of all the blocks made by the class.


Griet showed us how to make a star, house, tree, boat, cat and girl and boy figures. But I didn't get that far, once I had made the boat I got stuck on it, making a frame and more stars to go with it so I didn't make the boy and girl figures. I intend to make another border or two for the boat before I'm finished. I was really pleased with how the colour palette turned out on that. And yes, I know the flag on top of the mast is flying the wrong way and the prow is at the wrong end of the boat - I was all set to rip and resew that but they persuaded me it was ok to be wrong....

Sunday, 6 June 2010

Shoot for the Stars

I have been giving all the little ones in my family a bed quilt on their fifth birthday. Andrew happened to get one much earlier in his life plus he has the quilts his brothers were given when they turned five. So I decided he could have a wall hanging instead. I asked what his passions were and heard about rockets and spaceships. I am still experimenting with woven quilt backgrounds and spots look like stars so this has lots of woven spots and a spaceship - and the globe shows Australia as that is where he lives. Happy Birthday Andrew!

Andrew's mother Nadeeka has blogged about his reaction to the quilt.


Tuesday, 6 April 2010

Woven Quilts

I bought a new book recently, Simply Stunning Woven Quilts by Anna Faustino. So I treated myself to a play in the sewing room since I have now finished the most pressing of my UFOs. I still have UFOs and I intend to work on them before starting any other major project, but a little little quilt for the charity quilt auction at our club's next show was a 'refresher' before getting back to work. Here is the woven background and the finished quilt. It is called "Dusk over the Valley" and is A3 size (about 12"x 16")

Wednesday, 24 March 2010

Rooster Quilt Finished


Unfortunately I don't have a very good photo of the whole finished quilt yet but there are some good detail photos. AND its FINISHED!

If you want to check back to the beginning of this project, they whys and wherefores, here is the link:
http://nana-jan.blogspot.com/2009/03/new-project.html

To see the progress photos, click on the rooster link in the label cloud on the right hand side of the page.

Sunday, 10 January 2010

Little by Little

Some more before and after pics of progress - which is slow because we have a guest living in the sewing room at the moment and I can only get in there when she is away tramping for a couple of days.


Saturday, 2 January 2010

More on the Rooster


Back in March last year, before normal life was interupted, I started a new project. This may refresh your memory if you don't want to follow the links to my earlier posts:


I continued for a few more weeks but have done nothing on it since May 2009. I found other more urgent work to do when I had time for sewing.


However, now it is the urgent project as we have had word from France that the paintings for the doors are finished and the doors won't take very long to make. Aren't they fabulous?


 So I had better fulfill my part of the bargain and finish the quilt! Today I spent a couple of hours working on the tail feathers of the rooster. You can see a before and after comparison above.

Sunday, 8 November 2009

Success!

Yes, I finished on time, just. Terry has written a blog post on our trip to Wellington and you might as well read his, as he is a better writer than I am. I am hoping that Chris will post his photos of the day on Flickr so that I can borrow one or two for you. I know he took one of Jessica's lovely wide eyed reaction to the quilt when it was first held up for her to see. Here is the finished quilt, front and back.


Sunday, 25 October 2009

The back of the cat quilt

Here is the finished back of Jessie's cat quilt. It is made of fabric I bought for this quilt and didn't use for the front as it didn't fit with the other fabric so well - and some of it isn't cats, its dogs or monkeys but I thought it was cats when i bought it! Those are 17" squares with 3/4" sashing. The green outer border will mostly be trimmed off but as I am going to quilt it on the swiftquilter I need a generous edge. Looks like I might get it finished in time for her birthday on 8th November! Yayy!


Tuesday, 20 October 2009

Jessica's Cat Quilt

Two posts in one day after a loooooooooong drought! (see here for the other one). I know, I'll explain. While Terry was away on a business trip for four weeks, he took my camera. I don't like to post without pictures so I didn't post much, just one I think with a photo taken on my phone. Then as soon as he got back we had our grand-daughters to stay and after that I had minor surgery (all is well, it just took a while to recover from the anesthetic). So I haven't been quilting much and I haven't been thinking too well either! But now I am back doing both.

When my grand-children or my niece's children turn five, they get an "I'm Five!" quilt from me. Jessica is about to turn five and she has asked for cats. Unfortunately, because of all the interruptions to scheduled life we have had this year its not the fanciest I'm Five! quilt I've made but I hope the lovely fabric will make up for it. Here is the unquilted top. I'm going back out to the sewing room now to make a backing out of all the fabric I bought and didn't use in the top!